December 25, 2024

karácsonyi különkiadás // xmas special

A karácsonyi családi hepajra többféle csokival készültem, és nemcsak bonbonnal/trüffellel, hanem "látványelemekkel" is. A születésnapomra kapott kupont beváltottam egy rakás új öntőformára, amiket persze muszáj volt egyből kipróbálni :)) Így aztán készült egy csokicipő is - az első, de biztos vagyok benne, hogy nem az utolsó, mert imádtam pepecselni vele.


Hozzávalók:
a dekorhoz:
 200 gr fehércsoki
200 gr étcsoki
100 gr tejcsoki
lüszterpor, ételfesték, ehető arany
trüffelhez:
150 gr étcsoki
30 ml tejszín
két kiskanál vaj
25 ml portói bor
kakaópor
bobonhoz:
300 gr étcsoki
40 ml narancslé
10 ml tejszín
fahéj, szegűszeg
100 gr tejcsoki
cukordíszek


Elkészítés:
A dekorációk elkészítéséhez először jó alaposan kitörölgetem a formákat hogy szép fényes legyen majd a csoki. Ezután ételfesékkel festem meg a kívánt mintákat: a csokicipőhöz egy klasszikus cipőmintát kerestem, amit karácsonyi skótkockás színekben festettem fel, illetve az egyik oldalára a Merry Christmas felirat került. Miután elkészült a cipő, három ehető arany csillagot ragasztottam a másik oldalára. A gömbnél kis manósegítőm is besegített: én az egyik oldalra festettem karácsonyfát ő a másikra. Ügyelni kell, hogy amit elöl szeretnénk látni, azt fessük fel először (pl. a fánál a karácsonyfadíszeket), illetve hogy a feliratokat tükrözve kell fölfesteni. Miután elkészült a karácsonyfa, fehérrel összespricceltem a formát, hogy meglegyen a havazás is :) 
A karácsonyfadíszek két felét elkészítem, és amikor megszilárdultak, kiveszem őket a formából. Az egyik felet megtöltöm smarties-zal, majd a másik héjat röviden egy meleg lábos aljához érintem, és az így megolvasztott csokival összeragasztom a két felet. Végül lüszterporral lefestem a díszeket.

A bonbonokhoz előbb elkészítem a tölteléket: kifacsarom egy narancs levét, összeöntöm egy kis tejszínnel, és két szegfűszeggel, meg egy darabka fahéjjal felforralom. Hagyom kicsit állni, majd kiszedem a fűszereket. Ismét felmelegítem, és 100 gr feldarabolt étcsokira öntöm. Összekeverem, míg fényes ganache-t kapok. 
200 gr temperált étcsokiból elkészítem a cupcake-formákat. Hűtőbe teszem a bonbonformát, míg a csoki meg nem szilárdul. Ekkor kiszedem a héjakat, és színültig töltöm őket a narancsos krémmel. Temperálok 100 gr tejcsokit, és befedem a tölteléket, majd a még folyékony csokira karácsonyi cukordíszeket helyezek.

A trüffelhez felmelegítem a tejszínt, felolvasztom benne a vajat, majd az egészet 150 gr tördelt étcsokira öntöm. Hozzáadom a portói bort is, és ha szükséges, mikróba teszem, míg a csoki teljesen meg nem olvad. A krémet hűtőbe rakom pár órára, majd ha már elég szilárd halmazállapotú, golyócskákat gyúrok belőle, amiket megforgatok kakaóporban.


For our Christmas family gathering, I prepared various kinds of chocolates - not only bonbons and truffles but also decorations. I received a coupon for my birthday which I used to buy loads of new molds - and I had to try them now, of course :)) Therefore I also prepared a chocolate shoe - the first one, but definitely not the last because I loved making it!


Ingredients:
for the decoration:
 200 gr white chocolate
200 gr dark chocolate
100 gr milk chocolate
luster dust, food paint, edible gold
for the truffles:
150 gr dark chocolate
30 ml cream
two small spoon of butter
25 ml Port wine
cocoa powder
for the bonbons:
300 gr dark chocolate
40 ml orange juice
10 ml cream
cinnamon, clove
100 gr milk chocolate
candy decorations


Recipe:
For the decorations, first I thoroughly clean the molds in order to get a shiny result. Then I paint the patterns with food paint: for the chocolate shoe, I chose a classic pattern and painted it in tartan. I also added the inscription "Merry Christmas" on one side. When the shoe was done, I pasted three edible gold stars on the other side. As for the globe, my little Christmas elf also helped: I painted a Christmas tree on one side, he on the other. You have to pay attention to add those details first which you want to see on the front (e.g. in the case of the Christmas tree, the ornaments), and that for inscriptions, their mirror image must be painted in the mold. When the Christmas tree was done, I sprinkled the mold with white in order to create the falling snow :)
I prepared the two halves of the Christmas ornaments and when they got solid, I took them out of the mold. I filled one half with Smarties, then I pressed the other one to the bottom of a warm pot for a short while and glued the two halves together with the melted chocolate. Finally, I paint the ornaments with luster dust.

I prepare the bonbon filling: I press the juice of an orange, add a bit of cream, two cloves and a piece of cinnamon and boil the liquid. I leave it a bit to cool, then I discard the spices. I warm up the liquid again and pour it on 100 gr dark chocolate. I stir it until I get a smooth ganache.
I prepare the cupcake shells from 200 gr tempered dark chocolate. I put the mold in the fridge until the chocolate sets. Then I get the shells out of the mold and fill them with the orange cream to the brim. I temper 100 gr milk chocolate and cover the filling; finally, I place candy decorations on the top.

For the truffles, I warm up the cream and melt the butter in it, then I pour it on 150 gr dark chocolate. I add some Port wine and put the chocolate in the microwave if necessary to melt it. I place the dish with the ganache in the fridge for some hours and it gets solid. Then I shape small balls of it and roll them in cocoa powder.

December 21, 2024

mézeskalács // gingerbread

Mikulásra készítettem a következő bonbonokat. Az ötlet egy korábban készített csokiból jött, de akkor étcsoki burokba töltöttem, ezúttal viszont a minták kedvéért fehércsokiból öntöttem. A házi kismanónk besegített a díszítésben, így aztán valóban személyes ajándék került a családtagok csizmájába :))

Hozzávalók:
100 gr étcsoki
mézeskalács fűszer
Mese keksz
50 ml tejszín
egy kiskanál vaj
150 gr fehércsoki
ételfesték

Elkészítés:
A tejszínt felforralom, és az apróra tördelt étcsokira öntöm. Hozzákeverem a vajat és három csipet mézeskalács fűszert, majd egyneműre keverem.
A bonbonforma mélyedéseit kifestem karácsonyi mintákkal. Temperálom a fehércsokit, elkészítem a burkokat. Minden mélyedésbe tördelek néhány darabka Mese kekszet, amiket befedek a ganache-sal. Hűtőbe teszem a formát néhány órára, majd temperált fehércsokival lezárom a bonbonokat.


I made the following bonbons for our Saint Nicholas celebration. The idea came from a chocolate I had prepared earlier, but that time I had used dark chocolate shells, whereas this time I made them of white chocolate for the sake of the painting. My own little elf helped with the decoration, so this time a real personal chocolate was put into the relatives' boots :))

Ingredients:
100 gr dark chocolate
gingerbread spice
gingerbread
50 ml cream
one small spoonful of butter
150 gr white chocolate
food paint

Recipe:
I boil the cream and pour it on the chopped dark chocolate. I add butter and three pinches of gingerbread spice. Then I stir it until I get a smooth ganache.
I paint the cavities of the mold with Christmassy patterns. I temper the white chocolate and I prepare the shells. I put some tiny pieces of gingerbread into each bonbon which I cover with the ganache. I place the mold in the fridge for some hours. Finally, I cap the bonbons with tempered white chocolate.

November 16, 2024

karamellizált kesu // caramelized cashew

Két gyerek - főleg picik - mellett külön művészet, hogy az ember időt találjon a hobbijaira. Ilyenkor a számtalan érdeklődési kör közül mindig azt választja az ember, amire épp a legjobban vágyik, így hát feloszlik a (nemlétező) szabadidő az olvasás, írás, ímmel-ámmal zenélés, és persze a csoki között. A tölteléket már elég régen elkészítettem, és mostanáig mint reggeliző krémet ettük (nutellánál biztosan jobb :D), de most végre elérkezett az idő, hogy megszülessen az alábbi, isteni finom csokoládé is!!

Hozzávalók:
200 gr natúr kesudió
100 gr cukor
fahéj

pisztáciaolaj
200 gr fehércsoki
ételfesték

Elkészítés:
Serpenyőben megpirítom a kesudiót, majd hozzáöntöm a cukrot és közepes lángon addig kevergetem, amíg karamellizálódni nem kezd. Megvárom, hogy teljesen felolvadjon, bronzos színt nyerjen, és ha kellően bevonta a kesudiókat, megszórom a keveréket fahéjjal és sóval. Szilikonlapra terítem a kesut. Miután kihűlt, aprítógépbe öntöm 2-3 kiskanál pisztáciaolajjal, és addig darálom, amíg krémes masszát kapok.
Bronz festékkel összefröcskölöm a bonbonforma mélyedéseit. Temperálom a fehércsokit, elkészítem a bonbonok burkát. Megtöltöm őket a kesukrémmel, egy órára hűtőbe teszem a formát, végül temperált fehércsokival lezárom a bonbonokat.


When you have two kids - especially while they are little - you can barely find the time for your hobbies. During this phase, one chooses from among various interests the one that one desires the most, therefore the nonexistent freetime is divided between reading, writing, playing music and of course, chocolate. I prepared the filling a long time ago and up until now we've been eating it as a spread (it's much better than nutella :D), but now the time has come to finally make this amazingly good chocolate!!

Ingredients:
200 gr cashew nuts
100 gr sugar
cinnamon
salt
pistachio oil
200 gr white chocolate
food paint

Recipe:
In a pan, I fry the cashew nuts, then I add the sugar and on medium heat, I stir it until it turns into caramel. I wait until it melts completely, becomes bronze, and covers the nuts, then I sprinkle the mix with cinnamon and salt. I spread the cashew on a silicone sheet. After it gets cooler, I pour it in a food processor together with 2-3 small spoonfuls of pistachio oil, then I grind it until I get a smooth cream.
I splash bronze paint in the cavities of the mold. I temper the white chocolate and I prepare the shells. I fill them with the cashew cream, and put the mold in the fridge for an hour. Finally I cap the bonbons with tempered white chocolate.

September 29, 2024

Mozart praline 2

Beindult a csoki nagyüzem - az elmúlt egy hétben két adag is készült, ezek közül az egyik egy afféle Mozart praliné, ezúttal azonban kicsit megvariálva. A kétféle töltelék közül az egyik sima marcipán, míg a másik csokis nugátkrém. Olyan jó kísérletezni ezzel az alaprecepttel, és nagyjából minden variáns igazi ízélmény :)

Hozzávalók:
100 gr marcipán
80 gr diákcsemege (mogyoró, törökmogyoró, kesu)
egy kiskanál pisztáciaolaj
60 gr tejcsoki
200 gr étcsoki
50 gr fehércsoki

Elkészítés:
A magokat aprítógépbe szórom, meglocsolom pisztáciaolajjal, és összedarálom. Amikor már krémes állagot ölt, hozzáöntöm a felolvasztott tejcsokit, és tovább aprítom.
Temperálom az étcsokit, elkészítem a burkokat. A bonbonburkok aljába kis adag marcipánt nyomok, erre kerül a nugátkrém. Hűtőbe teszem a formát, amíg a krém megszilárdul. Ekkor temperált étcsokival lezárom a bonbonokat. Díszítésként temperált fehércsoki csíkokat húzok rá.


Finally chocolate making is on the go! This week I made two batches; one of those is a kind of Mozart praline, however, a bit different from the "original". There are two kinds of fillings inside: simple marzipan and chocolate nougat cream. I like to experiment with the Mozart recipe and basically every variety is a real experience :)

Ingredients:
100 gr marzipan
80 gr nuts (peanuts, hazelnuts, cashew)
small spoonful of pistachio oil
60 gr milk chocolate
200 gr dark chocolate
50 gr white chocolate

Recipe:
I pour the nuts in a food processor, pour pistachio oil on them and start grinding them. When I get a creamy consistency, I add the melted milk chocolate and grind it a bit more.
I temper the dark chocolate, I prepare the bonbon shells. I press a bit of marzipan in the bottom of the shells, and add nougat cream on top. I put the mold in the fridge until the cream gets solid. Then I seal the bonbons with tempered dark chocolate. I stripe the bonbons with tempered white chocolate.

September 15, 2024

citrom-áfonya // lemon-blueberry

VÉGRE VÉGE a nyárnak!! Mások biztosan várják meg szeretik, én elviselhetetlennek tartom ezt a hőséget, arról nem beszélve, hogy emiatt három hónapig csokit se tudtam készíteni (így kénytelen voltam belekóstolni a sütögetés világába, de erről majd máskor). Egyszóval emiatt, meg más okokból is egy nehéz és nyűg időszak volt, és őszintén szólva felőlem félévi eső is eshet, amíg nincs odakinn az a borzalmas 40 fok.
Na de most! Eljött végre az őszi ízek ideje! El is kezdtem egy jó kis áfonyával, és hosszas töprengés után úgy döntöttem, hogy citrom curddel fogom kiegészíteni - mindezt pedig fehércsoki burokban, hogy a savanykás ízeket ellensúlyozzam. A citrom curd tojás nélkül készült (nem szeretem nyersen enni a tojást, amióta egyszer szalmonellás lett az egész család :D), ám igencsak ízletes lett, azt hiszem, fogok még készíteni, gasztroajándéknak is jó lesz.

Hozzávalók:
egy citrom
35 gr cukor
25 gr vaj
étkezési keményítő
egy kupak whisky
60 ml áfonyapüré
pektin
200 gr fehércsoki
ételfesték

Elkészítés:
A vajat felolvasztom, közben a citrom héját lereszelem, a levét kifacsarom. Kimérem a cukrot is. A keményítőt a vajba keverem, majd beleöntöm a többi hozzávalót is. Végül egy kupaknyi whiskyt is hozzá adok. Néhány percig kis lángon forralom, míg besűrűsödik, akkor félreteszem hűlni.
Az áfonyát kipréselem, egy szitán átszűröm, az így kapott lét felforralom, és két csipet pektinnel besűrítem. Ezt is félreteszem.
Sárga festékkel összespriccelem a bonbonforma mélyedéseit. Miután ez a festék megszáradt, egy szivacsdarabka segítségével lilára festem a mélyedések közepét. Temperálom a fehércsokit, elkészítem a burkokat. Kiskanállal egy-egy adag áfonyapürét teszek beléjük, amit letakarok a citrom curddel. A formát hűtőbe teszem pár órára, végül temperált fehércsokival lezárom a bonbonokat.


FINALLY summer is over!! Others might look forward to it and love it, I find this heat unbearable, not to mention that I couldn't make chocolate for three months (therefore, I was forced to try baking but I'll write about that another time). Due to this and other reasons, it was a difficult period; and as for me, half a year's rain may fall as long as there's no horrid 40 degrees.
But now! It's time for autumn flavors. I started with blueberries, and after some brainstorming, I decided to add lemon curd - with a white chocolate shell in order to counterbalance the sour flavors. I prepared the lemon curd without eggs (I don't like to eat raw eggs ever since the whole family caught salmonella :D). It became quite good; I think I'll make some more, it will be good as a gift too.

Ingredients:
one lemon
35 gr sugar
25 gr butter
starch
whisky
60 ml blueberry puree
pectin
200 gr white chocolate
food paint

Recipe:
I melt the butter; in the meantime I grate lemon zest and squeeze the lemon juice. I measure out the sugar too. I mix the starch in the butter, then add the other ingredients. Finally, I pour a little bit of whisky in it. I simmer the lemon curd on low heat for some minutes, and when it gets dense, I turn off the heat.
I squeeze the blueberries and sieve its juice. I boil the liquid and thicken it with two pinches of pectin. I put the puree aside.
I sprinkle yellow paint in the cavities of the mold. When the paint gets  dry, I paint the middle of the cavities purple with the help of a sponge. I temper the white chocolate and I prepare the bonbon shells. I put a small portion of blueberry puree in them, which I cover with the lemon curd. I put the mold in the fridge for some hours. Finally, I seal the bonbons with tempered white chocolate.

May 18, 2024

áfonya-marcipán // blueberry-marzipan

- Tulajdonképpen ha állandóan a mesecsokiról papolsz, miért nem csináltál még sosem igazi mesecsokit?
- Mert két gyerek mellett...
- Ócska kifogás. Így is szinte minden hétvégén csokizol.
- Igazad van... na de milyen az igazi mesecsoki?
- Milyen lenne?! Olyan, ami mesél ha ránézel, mesél, ha megízleled.
- Egy csoki, amiről mesélni lehet?... hm.
- Ne legyél ilyen fantáziátlan! Szedd össze a kedvenc mesemotívumaidat.
- Rárajzolhatnálak téged például...
- Például. Szívesen.
- ......
Azzal a konyhaszekrényemben, a csokiformáim között lakó tündér visszavonult aludni.


Hozzávalók:
50 ml áfonyapüré
10 ml tejszín
200 gr étcsoki
100 gr marcipán
ételfesték

Elkészítés:
Az áfonyát leturmixolom, majd átpasszírozom, és kimerek belőle 50 ml-t. Hozzáöntök 10 ml tejszínt. A keverékbe beletépkedem a marcipánt, és  addig melegítem, amíg a marcipán el nem olvad. Ekkor félreteszem hűlni.
A bonbonforma mélyedéseit kifestem világoskékkel. Miután a festék megszáradt, fogpiszkálóval mesefigurákat karcolok bele. Temperálom az étcsokit, elkészítem a bonbonburkokat. Megtöltöm őket a marcipánkrémmel, hűtőbe teszem a formát néhány órára. Végül temperált étcsokival lezárom a bonbonokat.


"After all, since you are constantly preaching about fairytale chocolate, why haven't you ever made a real fairytale chocolate?"
"Because having to take care of two kids..."
"Bad excuse. You make chocolate almost every weekend even like this."
"You're right... but what is a real fairytale chocolate like?"
"What would it be like?! Like it tells you a tale when you look at it, it tells you a tale when you taste it."
"A chocolate about which you can tell a tale?... hm."
"Don't be so unimaginative! Collect your favorite fairytale motifs."
"I could draw you on it, for instance."
"For instance. You're welcome."
"....."
Then the fairy living in my cupboard, retired among my bonbon molds.

Ingredients:
50 ml blueberry puree
10 ml cream
200 gr dark chocolate
100 gr marzipan
food paint

Recipe:
I blend the blueberries, then sieve them and take 50 ml of the puree. I pour 10 ml cream in it. I tear up the marzipan into little pieces, put it in the liquid, and warm the pot until the marzipan melts. Then I put it aside.
I paint the cavities of the mold with light blue. When the paint dries, I scratch fairytale motifs in it with a toothpick. I temper the dark chocolate, and I prepare the bonbon shells. I fill them with the marzipan cream and place the mold in the fridge for some hours. Finally, I seal the bonbons with tempered dark chocolate.

May 11, 2024

Meggy-sáfrány // sour cherry-saffron

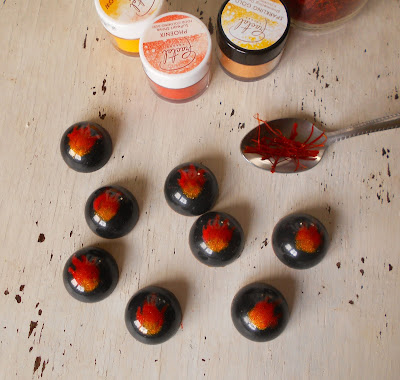
Nemrég kaptam a testvéremtől egy adag valódi sáfrányt Törökországból - ez nem az az itthon sok helyen árult ízetlen sáfrányos szeklice, ami még színre sem közelíti meg az igazit, hanem mélyvörös, füstös illatú, kincset érő igazi sáfrány. Persze első dolgom volt csokiba tenni :D Fűszeres ízét valami izgalmas kiegészítővel akartam kombinálni, és elsőre a meggy jutott eszembe - azonban meg kell vallanom, hogy alig lehetett érezni a sáfrány erős aromája mellett.


Hozzávalók:
egy csipet sáfrány
40 ml meggylé
20 ml tejszín
egy kiskanál vaj
100+200 gr étcsoki
ételfesték

Elkészítés:
Összeöntöm a meggylét és a tejszínt; beleszórom a sáfrányt és felforralom. Ezután leszűröm. Ismét megmelegítem, majd 100 gr apróra tört étcsokira öntöm. Hozzáadom a vajat is, és addig keverem, amíg fényes ganache-t nem kapok.
Ecset segítségével arany, narancs és piros ételfestékkel lángnyelveket festek a bonbonforma mélyedéseibe. Miután a minta megszáradt, fekete festékkel átfestem a hátteret. 
Temperálo 200 gr étcsokit, elkészítem a bonbonbok burkát. Megtöltöm őket a ganache-sal, hűtőbe teszem kis időre, majd temperált étcsokival lezárom a bonbonokat.


Not long ago I received a batch of real saffron from my sister from Turkey - this is not the flavorless safflower which can be bought basically everywhere and doesn't even come close to the original, but rich red, smoky, precious real saffron. Of course, my first thing was to put it in chocolate :D I wanted to add an exciting addition and I thought of sour cherry first - but I have to admit that I could barely feel it besides the saffron's strong aroma.


Ingredients:
a pinch of saffron
40 ml sour cherry juice
20 ml cream
one small spoon of butter
100+200 gr dark chocolate
food paint

Recipe:
I pour the sour cherry juice and the cream in a pan, add the saffron and boil it. Then I sieve the mixture. I warm it up again, and pour it on 100 gr dark chocolate. I add the butter, and stir it until I get a shiny ganache.
With a brush, I paint gold, orange and red flames in the cavities. After the pattern dries, I paint the background with black.
I temper 200 gr dark chocolate and I prepare the bonbon shells. I fill them with the ganache and place the mold in the fridge for a while. Then I seal the bonbons with tempered dark chocolate.

March 24, 2024

Erik csokija

Meggyőződésem, hogy a kreativitás mindenkiben megvan, csak meg kell találni a megfelelő médiumot hozzá. Szóval amikor a bölcsiben azt mondták, hogy a kisfiam nem szeret rajzolni, festeni, nincs türelme hozzá, én már tudtam, hogy a csokizáshoz kedve és türelme is van. Így aztán ma leültünk, kiválasztotta a bonbonformát, aztán elé raktam az összes ételfestékemet, amiből kiválasztott három színt. Kikevertük a színeket kakaóvajjal, és ő kifestette a bonbonforma mélyedéseit. Ez egy kb. félórás művelet volt, ami egy 2.5 éves gyerek esetében szerintem elég jó teljesítmény. Az így létrehozott csokikat tavaszias töltelékkel készítettem el, ami illett a választott színekhez is :) 
(remélem, ha nagy lesz, profi csokikészítő lesz, és majd én ehetem az ő csokijait, nem fordítva 😅)

Hozzávalók:
30 ml eperpüré
20 ml gránátalma szirup
200 gr fehércsoki   
100 gr étcsoki
Egy kiskanál vaj
ételfesték

Elkészítés:
A bonbonforma mélyedéseit zölddel, pirossal és naranccsal festettük ki. Temperálom a fehércsokit, elkészítem a burkokat. Ezután jön a töltelék: egybekeverem az eperpürét és a gránátalma szirupot, hozzáadom a vajat, majd felmelegítem. 100 gr összetördelt étcsokira öntöm a szószt, és összekeverem. Megtöltöm a bonbon burkokat, hűtőbe teszem egy órára, majd temperált fehércsokival lezárom a bonbonokat.

I am convinced that everyone can be creative given the right medium. So when they told me in the nursery that my son doesn't like to draw and paint, he's not patient for such activity, I knew already that he liked chocolate making and had patience for it, too. So today we sat down, he chose a mold, then I put out all my food colors, from which he picked three. We mixed the colors with cocoa butter and he painted the cavities of the mold. This took about half an hour which is a good achievement for a 2.5-year-old toddler. I filled the chocolates with a spring-ish filling which fit the chosen colors. :)
(I hope he'll become a professional chocolatier and I can eat his chocolates, not the other way round 😅)

Ingredients:
30 ml strawberry puree
20 ml pomegranate syrup
200 gr white chocolate   
100 gr dark chocolate
small spoon of butter
food paint

Recipe:
We colored the cavities with green, red and orange. I temper the white chocolate and I prepare the shells. Then comes the filling: I combine the strawberry puree and the pomegranate syrup, I add the butter and warm them up. Then I pour the sauce on 100 gr chopped dark chocolate. I fill the shells and I put the mold in the fridge for an hour. Finally I seal the bonbons with tempered white chocolate.

March 16, 2024

Cremini

Rettentően szeretem az olasz kaját. Nem vagyok egy sütis fajta, de a legtöbb sütijük, a saját csokimárkáik, az olasz különlegességek, pl. gianduja, na azok mindig mentek. Nemrég végre találtam törökmogyorót egy helyi boltban, és ennek apropóján megint elkezdtem mogyorós krémeket készíteni. Már nem is tudom, hogyan jött szembe a cremini receptje, a lényeg, hogy egyszeriben olthatatlan vágyat éreztem iránta, ezért tegnap készítettem is egy jó nagy adagot. Amit erről a desszertről tudni illik, az az, hogy mindhárom rétege csoki és mogyorókrém kombinációjával készül, ezért nevéhez híven nagyon krémes, lágy, könnyen olvad. Épp ezért érdemes hűtőben tartani, és csak fogyasztás előtt egy negyed órával elővenni. Én egy olasz receptet használtam; eredetileg természetesen IGP piemonti mogyoróból kéne készíteni, de az itthon aranyárban van... Amit még tudni érdemes a creminiről, az az, hogy függőséget okoz, ezért csak módjával szabad fogyasztani!!!

Hozzávalók:
100 gr étcsoki
100 gr tejcsoki
150 gr fehércsoki
135 gr mogyoró
olívaolaj

Elkészítés:
A mogyorót robotgépbe teszem, néhány kiskanál olívaolajat öntök hozzá (én négyet tettem, hogy krémesebb legyen), és addig darálom, míg sima pasztát nem kapok.
Felolvasztom az étcsokit és a tejcsokit, kimérek 75 gr mogyorópasztát, és egybekeverem őket. Egy kb 25x15 cm-es négyszögletes, magas falú edényt kibélelek sütőpapírral, beleöntöm a krém felét, kicsit a pulthoz ütögetem, hogy szétterüljön. Ezután az edényt a mélyhűtőbe teszem 10-15 percre, míg a krém teteje megszilárdul.
Eközben felolvasztom a fehércsokit, összekeverem 60 gr mogyorópasztával. Kiveszem az edényt a hűtőből, beleöntöm a fehércsokis krémet, és elegyengetem. Ismét visszarakom a mélyhűtőbe egy kis időre, míg a krém megköt. Ekkor a tetejére öntöm a maradék étcsokis krémet, és még félórára hűtőzöm.
Amikor kész a cremini, a sütőpapírnál fogva kiveszem az edényből, lehámozom a papírt, és egy éles késsel levágom az egyenetlen széleket. Kb. 2x2 cm-es kockákat vágok, és tálalom.


I adore Italian cuisine. I don't usually like cookies, but most of their pastries, their own chocolate brands and Italian specialties like gianduja, well, I've always been a fan :D Not long ago I discovered hazelnuts in a local shop and I started to make various hazelnut spreads and creams. I don't even remember how I found the recipe of cremini, but suddenly I felt an unquenchable desire for them, so yesterday I made a huge portion. What you need to know about this dessert is that all three layers are made with the combination of chocolate and hazelnut paste, therefore it is very creamy, silky and melts easily. Therefore it is advisable to keep it in the fridge and take it out only 15 minutes before consuming. I used an Italian recipe; originally it would be best to use IGP Piemontese hazelnut, but that costs a fortune... What you also need to know about cremini is that it causes addiction, so eat it with caution!!!

Ingredients:
100 gr dark chocolate
100 gr milk chocolate
150 gr white chocolate
135 gr hazelnut
olive oil

Recipe:
I put the hazelnut in a blender and pour some olive oil on it to make it more creamy. Then I blend it until I get a smooth paste.
I melt the dark and milk chocolates, and add 75 gr hazelnut paste. I line a ca. 25x15 cm dish with parchment paper and pour half of the cream in it, then tap it on the counter so that it spreads evenly. Finally, I put the dish in the freezer for 10-15 minutes until the cream sets.
In the meantime, I melt the white chocolate and combine it with 60 gr hazelnut paste. I take the dish from the freezer and pour the white chocolate cream in it. I put it back in the freezer for a while until the cream sets. Then, I pour the leftover dark chocolate cream on the top and leave it in the fridge for about half an hour.
When the cremini are ready, I lift it out of the dish, peel off the parchment sheet and cut off the edges. Finally, I cut 2x2 cm cubes and they are ready to be served.

January 28, 2024

gránátalma-chili // pomegranate-chili

Nagyon szeretek csokival bíbelődni, és még amikor semmi energiám, néha olyankor is bekattan és nekilátok órákon át festegetni egy tálcányit. Ez most épp ilyen alkalom volt - előre készítettem Valentin-napi csokit életem férfijainak :D Úgy tűnik, a következő napokban nem igazán lesz időm ilyesmire, úgyhogy előre kellett cselekedni :)

Hozzávalók:
25 ml gránátalma szirup
25 ml tejszín
10 gr vaj
100 gr tejcsoki
200 gr fehércsoki
chili
ételfesték

Elkészítés:
A tejcsokit apró darabokra tördelem és egy tálkába teszem. Összeöntöm a gránátalma szirupot, a tejszínt és a vajat, és felforralom őket. Ezután a csokira öntöm, és addig kevergetem, amíg fényes ganache-t nem kapok. Chilivel ízesítem.
A forma mélyedéseit porfesték és olvasztott kakaóvaj keverékével díszítem. Temperálom a fehércsokit, elkészítem a bonbonok burkát. Megtöltöm őket a gránátalmás krémmel, majd hűtőbe teszem a formát. Amikor a ganache megbőrösödött, kiveszem, és temperált fehércsokival lezárom a bonbonokat.


I love to deal with chocolate, and sometimes this overwhelms me even when I have zero energy and I start to paint for hours to make a tray of nice looking bonbons. This was such an occasion - I had to prepare the Valentine's day chocolate for my men in advance :D It seems that in the coming days I won't have time for it, so I had to do it now :)

Ingredients:
25 ml pomegranate syrup
25 ml cream
10 gr butter
100 gr milk chocolate
200 gr white chocolate
chili
food paint

Recipe:
I break the milk chocolate into smaller pieces and put them in a bowl. I pour the pomegranate syrup, the cream and the butter together and boil them. Then I pour them on the chocolate and stir it until I get a shiny ganache. I season it with chili.
I decorate the cavities of the mold with the mixture of paint powder and cocoa butter. I temper the white chocolate and I prepare the bonbon shells. I fill them with the pomegranate cream, then I put the mold in the fridge. When the ganache sets, I take it out and I seal the bonbons with tempered white chocolate.