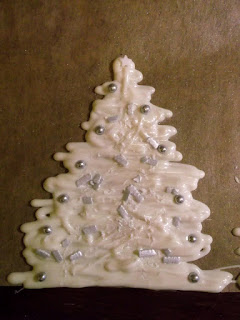
Az ötlet tortadekorációból jött :) De mivel papírból olyan könnyű ilyesmit csinálni, ki akartam próbálni, hogy ez a csokira is igaz-e. És igen! Ajánlom mindenkinek, aki mutatós karácsonyi díszt szeretne az ünnepi asztalra, amit aztán jól föl is lehet enni a desszerttel :D
Előkészület:
A neten található papírra nyomtatható összerakhatós karácsonyfaminták közül egyet egy darab sütőpapírra másolok (én ezt használtam). Valójában magára a mintára nem lesz szükség, csak arra, hogy meddig kell majd bevágni.
Hozzávalók:
100 gr fehércsoki
kókuszreszelék
lüszterpor
cukordíszek
Elkészítés:
Sütőpapíron a minta alapján előre megjelölöm, mekkorára szeretném készíteni a fa két felét, hogy egyforma magasak legyenek - alapnak a sütőpapír egyenesre vágott alját veszem. Temperálom a fehércsokit. Habzsákba töltöm, és kis lyukon keresztül gyors mozdulatokkal cikkcakkban folyatom a papírra a kijelölt csúcsig, úgy, hogy nagyjából háromszög alakú legyen (így egyszerűbb, de a kísérletező kedvűek megpróbálkozhatnak a klasszikus karácsonyfa alakkal is). Nem kell túl vastag réteg belőle! Két fát készítek, és a sütőpapírt félrehúzva le lehet törölni az aljáról a felesleget, így egyenes lesz a fa legalja. Mielőtt a csoki megszilárdul, késhegyről lüszterport fújok rá, megszórom kókuszreszelékkel, és feldíszítem :) Nálam egy ezüst és egy arany színű fa készült.
Mikor a csoki elkezd szikkadni (de még mielőtt teljesen megszilárdul!), a papíron előrajzolt karácsonyfa mintában bevágom az összeillesztés helyét, és a csokifák fölé helyezve a résben késsel végigvágom a csokit is. A papírt ezután el lehet tenni, a csokiban pedig kiszélesítem a rést annyira, hogy biztosan össze lehessen majd illeszteni a két részt. Ezután már csak várni kell, hogy megszáradjon a csoki, óvatosan lehúzni a papírról, összeszerelni, és kész is!
The idea came from a cake decoration :) But since this is so easy to make of paper, I wanted to try whether the same is true to chocolate. And yes, it is! I recommend trying this to everyone who'd like to have a beautiful Christmas decoration on their table, which can be eaten up together with the dessert :D
Preparation:
I copy one of those compilable Christmas tree patterns that can be found online on a piece of baking paper (I used this one). You won't need the pattern itself, just for measuring the length of the cut in the middle.
Ingredients:
100 gr white chocolate
shredded coconut
luster dust
candy decors
How to prepare:
I mark on a sheet of baking paper how high the two parts of my trees are going to be: they must be of the same height. Their base is the straight edge of the baking paper. I temper the white chocolate, I pour it in a piping bag and I quickly make zigzags on the paper from its edge up to the top that I marked previously. The shape should be more or less a triangle (you can also experiment with the classic Christmas tree shape). The chocolate layer shouldn't be too thick! I make two trees and pulling away the baking paper a bit, I get rid of the excess on the bottom, thus the base of the trees will be straight. Before the chocolate sets I blow some luster dust on them from the tip of a knife, I sprinkle shredded coconut on them and I adorn them :) I prepared a silver and a gold tree.
When the chocolate sets (but before it hardens!), I cut in the middle line of the previously drawn paper tree patterns. I put them above the chocolate trees and I cut through the lines in the chocolate too - one from below, the other from above. I put aside the paper and I broaden the cuts in the chocolate so that the two halves can be put together more easily. After that I only have to wait for the chocolate to get solid, then pull it off the paper, put it together and voilá! It's ready :D


No comments:
Post a Comment