
A táska ötlete Ann Reardon videójából eredt, rendelésre készült :) Ann honlapján meg lehet rendelni a sablont, én viszont sajátot készítettem - valójában nem olyan nehéz, meg amúgy is szeretek kézműves dolgokkal bíbelődni. A táska maga 11x21 cm-es, papírból kivágva és félig összegöngyölítve körberajzoltam a szélét, így megkaptam, nagyjából mekkorának kell lennie az oldalának. A teteje ugyanilyen széles, a hosszúsága pedig azon múlik, mennyit szeretnénk, hogy elfedjen a a táskából. A pánt 26x1.5 cm-es.
Hozzávalók:
150 gr tejcsoki
50 gr fehércoki
transzferfólia
dekorgyöngyök
lüszterpor
Elkészítés:
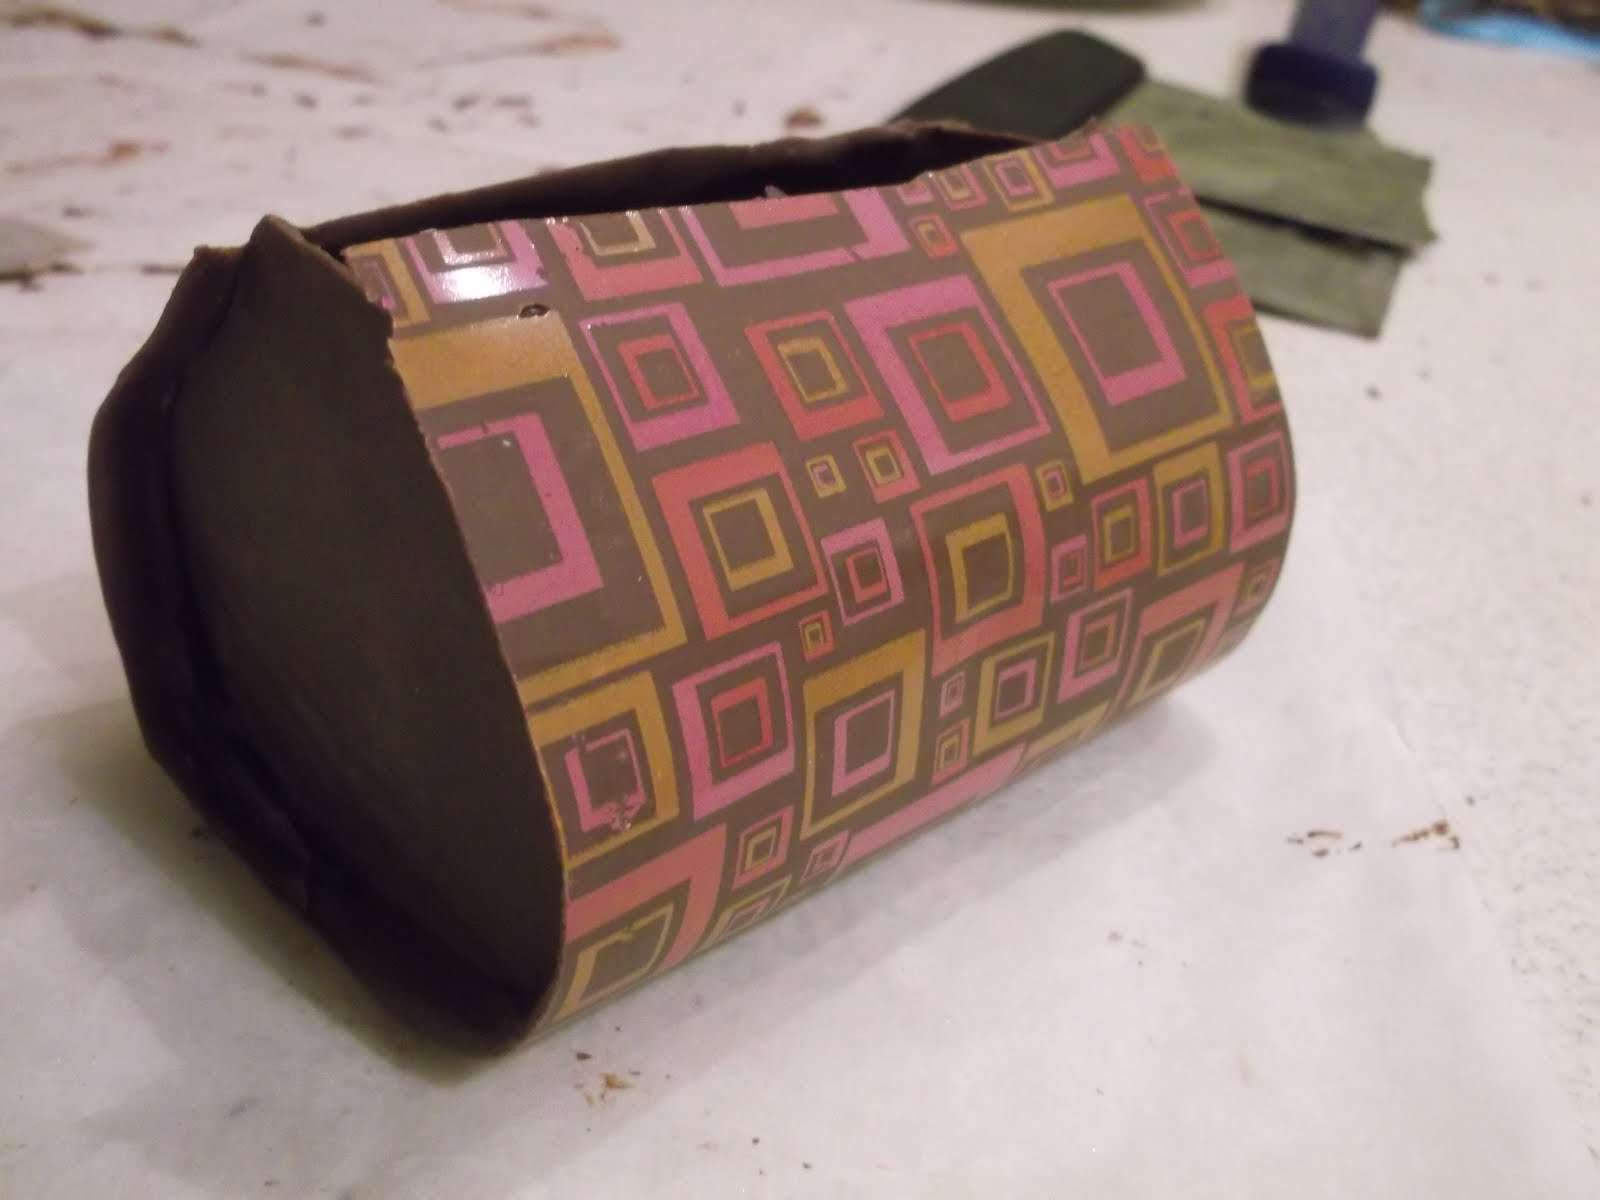
Ugyanúgy, ahogy a videóban látható. Előbb a széleket és a két kis támaszték háromszöget készítettem el, és miután megszáradtak, összeállítottam őket. Ezután temperált csokit terítettem a transzferfóliára, és amikor a csoki elkezdett szikkadni, ráhelyeztem a széleket, és köréjük göngyölítettem a csokilapot. Az elkészítés során arra kell ügyelni leginkább, hogy a csokit a dermedésnek a megfelelő pontján hajlítsuk meg, mert ha túl folyós, akkor maszatolódik, ha pedig már megkeményedett, akkor össze fog törni. Az alkalmas pillanat akkor van, amikor a felszíne már nem nedvesen fénylik, hanem "tompa" fényű lesz.

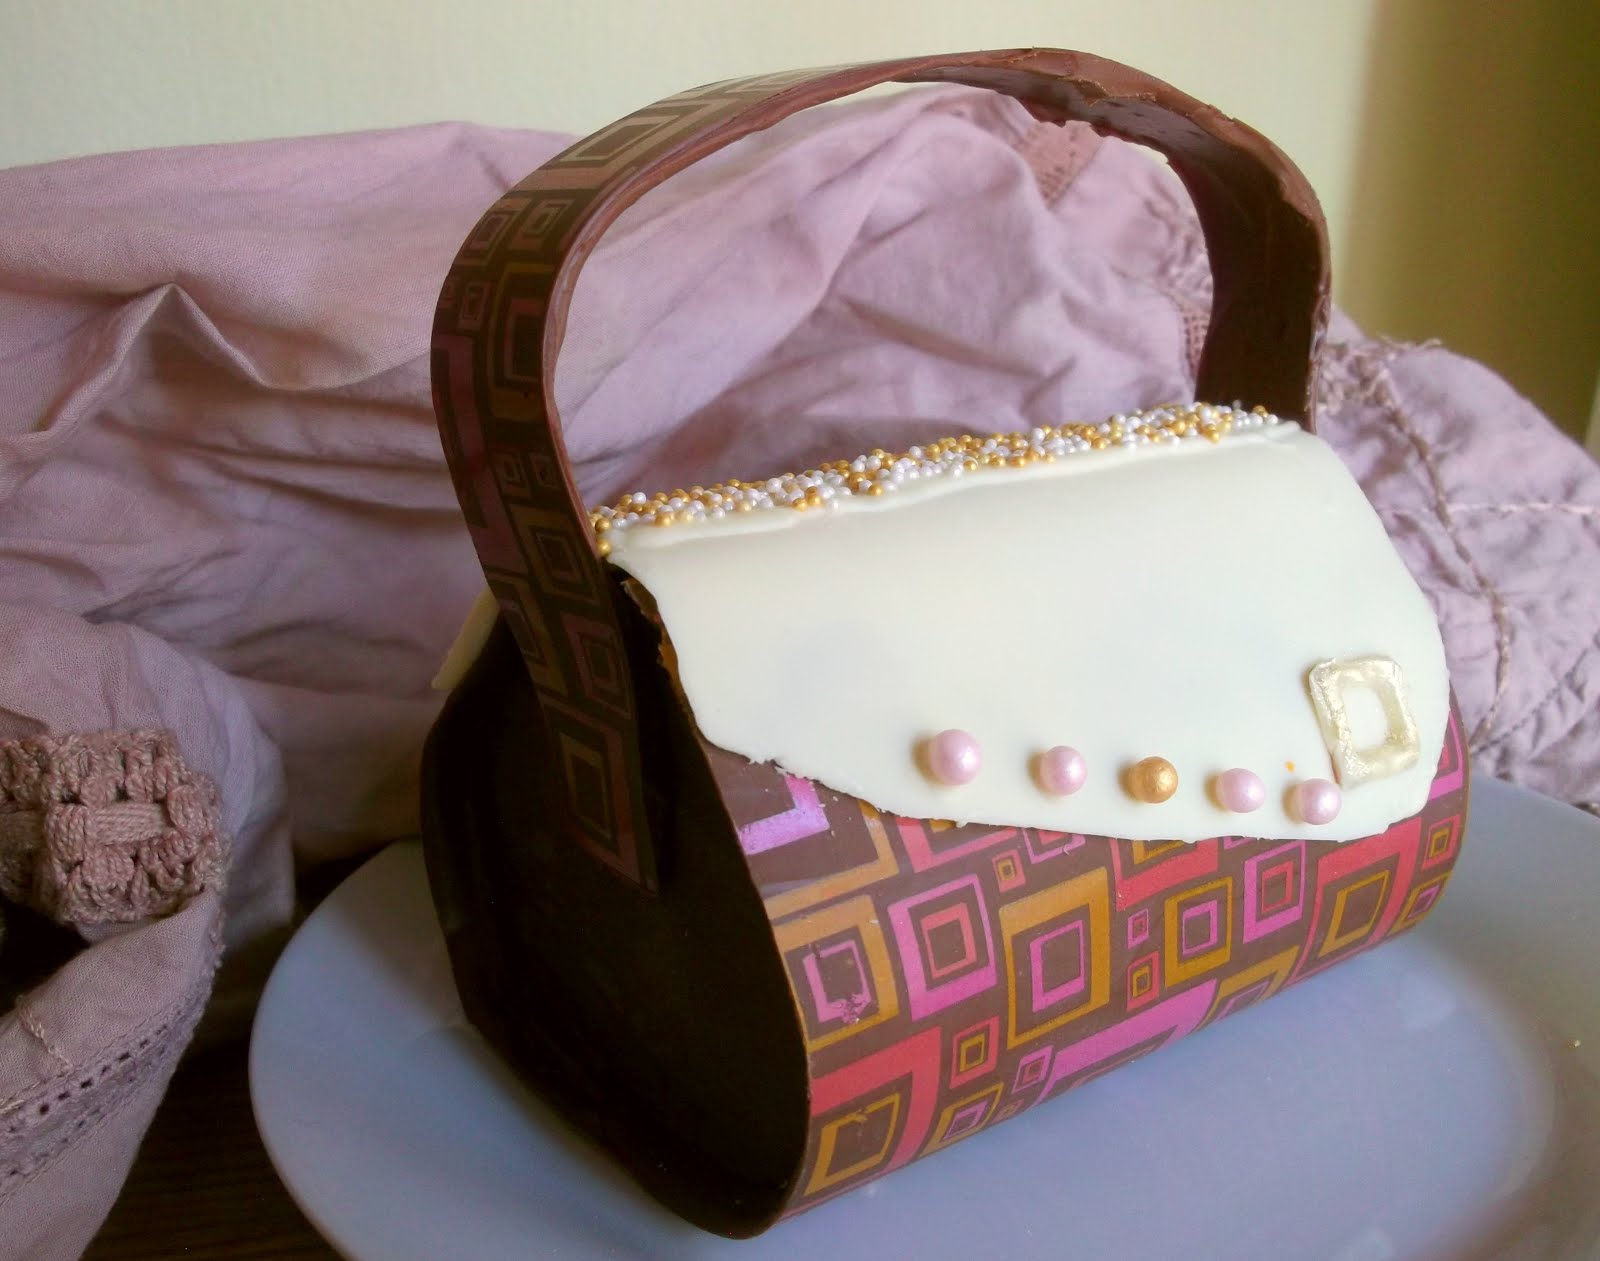
Megtöltöttem a táskát pezsgős bonbonokkal, és elkészítettem a tetejét. Ann elég konvencionális darabokat készített, én viszont kicsit lendületesebb, fiatalosabb táskát akartam, ezért lett féloldalas a fehércsoki rész. Ezt aztán úgy díszítjük, ahogy akarjuk - én egy csíkot festettem temperált csokiból a tetejére, és megszórtam dekorgyönggyel, szintén fehércsokiból csatot készítettem rá, amit lüszterporral festettem aranyra.
Végül következik a táska szíja: ezt is transzferfóliával készítettem, és a dermedés megfelelő pontján rögzítettem a táska két oldalához.

The idea of this chocolate bag comes from Ann Reardon's video. You can order the template at Ann's website, but I made my own - it is not that difficult and I like to deal with handicraft stuff. The bag itself is 11x21 cm, I cut it out of paper and half rolled up I drew around its edge, thus I got how big the sides of the bag should be. The top is the same in width, its length depends on how much you want it to cover the bag. The strap is 26x1.5 cm.

Ingredients:
150 gr milk chocolate
70 gr white chocolate
transfer sheet
decor pearls
luster dust
How to make it:
It is the same as in the video. First I prepared the sides of the bag and two small triangles to hold them in their place. When they got dry, I fixed them together. Afterwards I spread tempered chocolate on the transfer sheet and when it started to set, I placed the sides on it and I rolled the chocolate sheet around them. While making it, you have to be careful to bend the chocolate at the right moment: if it is too liquidish, then it will get smeared, if it is too hard, then it will break. The right moment is when the surface doesn't look wet, but matt.

I filled the bag with champagne bonbons and I prepared the top. Ann made quite conventional pieces, I wanted something more modern, that's why the white chocolate part is lop-sided. You can decorate it the way you want it - I painted a white cocolate stripe on the top and sprinkled it with decor pearls and I made a buckle of white chocolate, which I painted with golden luster dust. Finally I made the strap: I used the same transfer sheet for this too and I attached it to the two sides of the bag.
Hozzávalók:
150 gr tejcsoki
50 gr fehércoki
transzferfólia
dekorgyöngyök
lüszterpor
Elkészítés:
Ugyanúgy, ahogy a videóban látható. Előbb a széleket és a két kis támaszték háromszöget készítettem el, és miután megszáradtak, összeállítottam őket. Ezután temperált csokit terítettem a transzferfóliára, és amikor a csoki elkezdett szikkadni, ráhelyeztem a széleket, és köréjük göngyölítettem a csokilapot. Az elkészítés során arra kell ügyelni leginkább, hogy a csokit a dermedésnek a megfelelő pontján hajlítsuk meg, mert ha túl folyós, akkor maszatolódik, ha pedig már megkeményedett, akkor össze fog törni. Az alkalmas pillanat akkor van, amikor a felszíne már nem nedvesen fénylik, hanem "tompa" fényű lesz.
Megtöltöttem a táskát pezsgős bonbonokkal, és elkészítettem a tetejét. Ann elég konvencionális darabokat készített, én viszont kicsit lendületesebb, fiatalosabb táskát akartam, ezért lett féloldalas a fehércsoki rész. Ezt aztán úgy díszítjük, ahogy akarjuk - én egy csíkot festettem temperált csokiból a tetejére, és megszórtam dekorgyönggyel, szintén fehércsokiból csatot készítettem rá, amit lüszterporral festettem aranyra.
Végül következik a táska szíja: ezt is transzferfóliával készítettem, és a dermedés megfelelő pontján rögzítettem a táska két oldalához.
The idea of this chocolate bag comes from Ann Reardon's video. You can order the template at Ann's website, but I made my own - it is not that difficult and I like to deal with handicraft stuff. The bag itself is 11x21 cm, I cut it out of paper and half rolled up I drew around its edge, thus I got how big the sides of the bag should be. The top is the same in width, its length depends on how much you want it to cover the bag. The strap is 26x1.5 cm.

150 gr milk chocolate
70 gr white chocolate
transfer sheet
decor pearls
luster dust
How to make it:
It is the same as in the video. First I prepared the sides of the bag and two small triangles to hold them in their place. When they got dry, I fixed them together. Afterwards I spread tempered chocolate on the transfer sheet and when it started to set, I placed the sides on it and I rolled the chocolate sheet around them. While making it, you have to be careful to bend the chocolate at the right moment: if it is too liquidish, then it will get smeared, if it is too hard, then it will break. The right moment is when the surface doesn't look wet, but matt.

No comments:
Post a Comment